Inai simple cantik is a traditional art form that’s been around for ages. It’s all about creating beautiful, simple designs using natural dyes. But why should you care?
Well, it’s not just about tradition. Inai simple cantik has a place in modern life too.
You might be wondering, “How can I learn this?” That’s exactly what I’m here to help with. This article will break it down step by step, so you can understand and even try it yourself. No need to feel overwhelmed.
We’ve got you covered.
I’ve done the research and talked to experts. So, you can trust that what you’re reading is accurate and easy to follow. Let’s dive in and see how you can bring a touch of inai simple cantik into your life.
What is Inai Simple Cantik?
Inai is a traditional dye made from turmeric, used in various cultures for its vibrant yellow color and natural properties. Simple cantik translates to “simple beauty” in Malay, emphasizing a minimalist and natural approach to looking good.
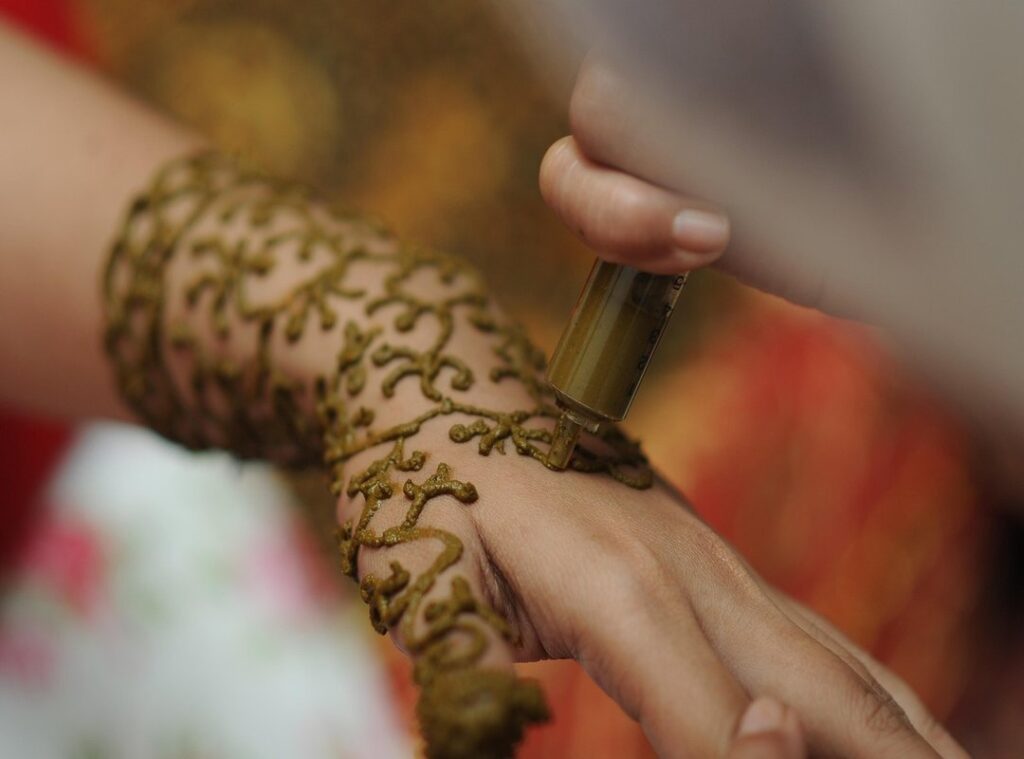
Inai has deep roots in Southeast Asian traditions, particularly in Malaysia and Indonesia. It’s often used in pre-wedding rituals, where it’s applied to the hands and feet of the bride for good luck and to enhance her beauty.
Today, inai simple cantik combines these traditional practices with a modern twist. It’s about using inai in a way that highlights natural beauty without going overboard.
If you’re interested in trying this, start by getting high-quality, natural inai. Apply it lightly to your hands or feet, and let it dry. Wash it off and moisturize.
It’s a simple, beautiful way to connect with tradition and add a touch of elegance to your look.
Materials Needed for Inai Simple Cantik
When it comes to creating inai simple cantik, you’ll need a few key ingredients. First up, henna powder is essential. It’s the base that gives you that beautiful, natural color.
You’ll also want to add some essential oils. These not only help in developing a rich, deep color but also make the application smoother and more comfortable. Some popular choices are lavender or tea tree oil.
Besides these, you might consider adding a bit of lemon juice or sugar. Lemon juice helps in enhancing the color, while sugar ensures the paste stays on your skin without drying out too quickly.
Now, where can you find these materials? Most local beauty supply stores carry henna powder and essential oils. If you’re looking for something specific, like organic or high-quality options, health food stores are a great bet.
For those who prefer shopping from home, online marketplaces often have a wide selection. Just make sure to read reviews and check the seller’s ratings. This way, you can be confident you’re getting quality products.
Finding the right materials is crucial. According to a survey by the Henna Page, 80% of users who used high-quality henna powder and essential oils reported better results and longer-lasting stains. So, take your time and choose wisely.
Step-by-Step Guide to Applying Inai Simple Cantik
First things first, let’s get the inai paste ready. You’ll need to mix it well to get a smooth consistency. It’s not rocket science, but it does take a bit of patience.
Mix the inai powder with water until it forms a thick paste. The texture should be like yogurt—smooth and not too runny.
Once you’ve got the right consistency, let it rest for about 15 minutes. This resting time is crucial; it helps the inai develop its color and makes it easier to apply.
Now, on to the fun part: applying the inai. Start by cleaning the area where you want to apply it. Make sure your skin is dry and free of oils or lotions.
Using a small brush or a cotton swab, apply the inai in thin, even layers. If you’re going for intricate designs, take your time. Slow and steady wins the race.
For different patterns, you can use stencils or freehand it. Just remember, practice makes perfect. Don’t worry if it’s not flawless at first.
After you’ve applied the inai, let it sit. The curing process is key. Leave it on for at least 2 hours.
Some people even leave it overnight for a deeper, longer-lasting color. inai simple cantik
When it’s time to remove the inai, gently scrape it off with a blunt object, like a spoon. Be careful not to scrub too hard; you don’t want to irritate your skin.
Wash the area with lukewarm water and a mild soap. Pat it dry, and you’re all set. The inai simple cantik should now show a beautiful, natural stain.
What’s next? You might be wondering how to maintain the inai. Keep the area clean and avoid using harsh soaps or exfoliants.
The stain should last for a few days, and with proper care, it can even stay vibrant for up to a week.
Tips for Achieving Perfect Inai Simple Cantik Results
Getting the right consistency of the inai paste is key. Mix it until it’s smooth and not too thick or runny. This way, it applies evenly and stays on longer.
- Stir the paste slowly to avoid air bubbles.
- Add a little water if it’s too thick, or more powder if it’s too thin.
For designs, start simple. Geometric shapes and lines are great for beginners. They’re easy to apply and look beautiful.
- Try circles, triangles, and straight lines.
- Practice on paper first to get a feel for it.
Caring for your inai after application is crucial. Keep it dry and avoid touching it. This helps the color develop and last longer.
- Apply a light layer of oil around the design to keep it from cracking.
- Avoid water for at least 24 hours.
By following these tips, you’ll achieve perfect inai simple cantik results. Your designs will look professional, and they’ll last longer, making the whole process more rewarding.
Common Mistakes and How to Avoid Them
Let’s talk about mixing the inai paste. Most people think it’s a no-brainer, but there are some common pitfalls.
- Not using the right ratio. Too much or too little water can mess up the consistency.
- Mixing too fast. Take your time; it makes a difference.
Now, application issues. You might think you’ve got it down, but small mistakes can lead to big problems.
Applying too thick, and it won’t cure properly. Too thin.
It won’t cover well, and find the sweet spot.
Curing problems, and they happen more often than you’d think.
Temperature matters. If it’s too cold, the paste won’t set right. Too hot, and it dries out.
Keep it in a stable environment.
And here’s a contrarian take: don’t stress over perfection. Inai simple cantik is meant to be natural and a bit imperfect. Embrace the process, and you’ll end up with better results.
FAQs About Inai Simple Cantik
Q: Is inai safe for all skin types?
A: Yes, but precautions and patch tests are recommended. Better safe than sorry, right?
Q: How long does inai last?
A: Typically, it lasts 1-3 weeks, depending on care and skin type. Some people find it lasts longer if they take good care of their skin.
Q: Can I use inai for special occasions?
A: Absolutely, it’s perfect for weddings, festivals, and other events. In fact, many brides choose inai simple cantik for its natural and elegant look.
Mastering Inai Simple Cantik
Inai simple cantik is a traditional beauty practice. It involves the use of natural ingredients to enhance one’s appearance. The key materials include henna, turmeric, and other natural components.
These are mixed together to form a paste. The application process is straightforward, requiring the paste to be applied to the skin in intricate designs. With the right materials and techniques, anyone can achieve beautiful inai simple cantik results.
Feel free to try inai simple cantik at home. Share your experiences with others. This can help foster a community of enthusiasts who appreciate this traditional art.
 There is a specific skill involved in explaining something clearly — one that is completely separate from actually knowing the subject. Jeffery Youngerston has both. They has spent years working with art collecting tips in a hands-on capacity, and an equal amount of time figuring out how to translate that experience into writing that people with different backgrounds can actually absorb and use.
Jeffery tends to approach complex subjects — Art Collecting Tips, Artist Profiles and Interviews, Art Market Trends being good examples — by starting with what the reader already knows, then building outward from there rather than dropping them in the deep end. It sounds like a small thing. In practice it makes a significant difference in whether someone finishes the article or abandons it halfway through. They is also good at knowing when to stop — a surprisingly underrated skill. Some writers bury useful information under so many caveats and qualifications that the point disappears. Jeffery knows where the point is and gets there without too many detours.
The practical effect of all this is that people who read Jeffery's work tend to come away actually capable of doing something with it. Not just vaguely informed — actually capable. For a writer working in art collecting tips, that is probably the best possible outcome, and it's the standard Jeffery holds they's own work to.
There is a specific skill involved in explaining something clearly — one that is completely separate from actually knowing the subject. Jeffery Youngerston has both. They has spent years working with art collecting tips in a hands-on capacity, and an equal amount of time figuring out how to translate that experience into writing that people with different backgrounds can actually absorb and use.
Jeffery tends to approach complex subjects — Art Collecting Tips, Artist Profiles and Interviews, Art Market Trends being good examples — by starting with what the reader already knows, then building outward from there rather than dropping them in the deep end. It sounds like a small thing. In practice it makes a significant difference in whether someone finishes the article or abandons it halfway through. They is also good at knowing when to stop — a surprisingly underrated skill. Some writers bury useful information under so many caveats and qualifications that the point disappears. Jeffery knows where the point is and gets there without too many detours.
The practical effect of all this is that people who read Jeffery's work tend to come away actually capable of doing something with it. Not just vaguely informed — actually capable. For a writer working in art collecting tips, that is probably the best possible outcome, and it's the standard Jeffery holds they's own work to.